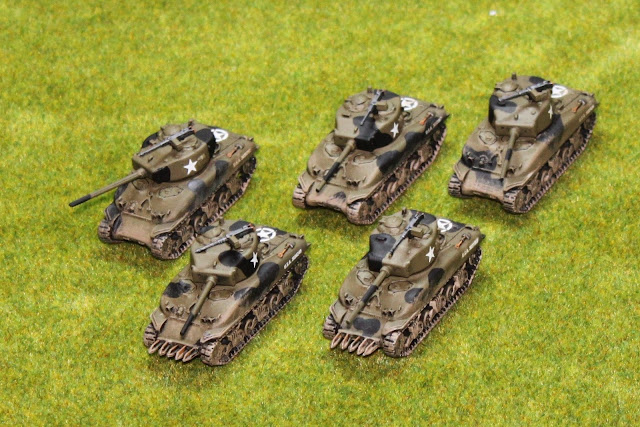
Secondary armament took the form of two .30 cal MG's and one .50 cal AA MG. However with a maximum armour thickness of just 62mm the M4A1 remained vulnerable in head to head battles with German Panthers and Tigers. However as with earlier models the real advantage of the Sherman was its speed and manoeuvrability and the fact that it was available in huge numbers.
I've painted two tanks up with Cullin Hedgerow Cutters fitted to the front. The hedgerows of the Normandy Bocage were a serious obstacle to movement of Allied armour. The Cullin cutters enabled allied tanks to plough through these hedges without exposing their weak underside armour. Ironically these accessories were often made from reused metal taken from German hedgehog sea defences.
 Here are the steps I followed painting these vehicles.
 1) Cleaning flash and mould lines from all parts
2) Assembly using superglue and Epoxy Resin.
3) Washing in soapy water to remove all grease and mould release residue.
4) Spray undercoat with GW Black
5) Dry brushing with Brown Violet (887). Three coats applied to whole model with a large brush.
6) Dry brush with 50/50 mix of Brown Violet (887) and Khaki (988) to bring out detail.
7) Apply Black (950) to tracks and metal items such as machine guns and tools.
8) Drybrush tracks Gunmetal Grey (863), Machine Guns, Tools and other bare metal items.
9) Black (950) camo pattern added to Hull and Turret of vehicles
10) Details such as wooden tool handles in Black Brown (822) and Highlighted with Dark Sand (847)
11) Black lining using 1 part Black (950) to 3 parts distilled water.
12) Apply decals using softener - Allow 24hrs to harden and set
13) Dirt and mud effects added to hull and tracks using Tamiya 'mud' pens and acrylic paints.
14) Allow to dry for 24hrs. The Mud Pen effects in particular take a long time to harden.
15) 2-3 coats of Testors Dullcote spray, allowing 24hrs after the first and 12 hrs after subsequent coats.
16) Superglue Magnets inside turret cavity (making sure they are oriented correctly)
17) Sit back and admire.

I've deliberately tried to make painting vehicles as easy as possible, with the minimum number of steps between starting and finishing the project. I've spent far too long gathering together my FoW figures and its time I 'stepped up production' and got serious about wargaming with my models.
Now all I need to do is focus on the next project which is already assembled and under-coated!!


Very nice stuff, keep it up.
ReplyDeleteSome nice cool looking models.
ReplyDeleteVery sharp looking models! A bit off topic, Lee, but who makes the game mat in the photo?
ReplyDeleteIt's the evil empire... Games Workshop. It's 120x180cm so ample for most tables. A bit pricey at £18 but I like it.
ReplyDeleteVery nice! I'm just starting to get into tanks myself and was interested that you are using the violet brown, which I've heard is a good Olive Drab tone.
ReplyDeleteSimon
Simon made me think. The violet brown looks better in the upper photos, just a camera and lighting thing when shooting green. I've used Tamiya's olive green. It looks fine on large scale models but I think can seem too dark for small figures. VB might do the trick better.
ReplyDeleteBTW didn't most US armor have no camo or markings? I've seen photos where guys painted over the stars, which were like big bulls-eyes for the Germans.
Very nice Lee, keep 'em coming!
ReplyDeleteBig Lee,
ReplyDeleteWhat kind of black primer do you use specifically? I have always used white brush on for fantasy miniatures, but I can see the value of using black for vehicles. I just got into FOW and am working on building US 3rd armored division. The painting walk through is nice, thank you.
Add some artillery for the US via the assault gun platoon and one for the HQ. Have 2iC and the extra gun all join the platoon. Don't forget your anti-anything guns and check out http://www.3ad.com/history/wwll/spearhead.west.index.htm for some ideas to finish your 2nd Armored.
I prefer spray base coat myself. I use GW Chaos Black spray. No particular reason for this other than the fact that I have a store close to me and its easy to get (and I picked up three cans cheap when I was at SELWG last October!).
ReplyDeleteAll my other painting is doen using Vallejo paints, either their game colour range (for fantasy figures) or the Panzer Aces range (for FOW stuff).