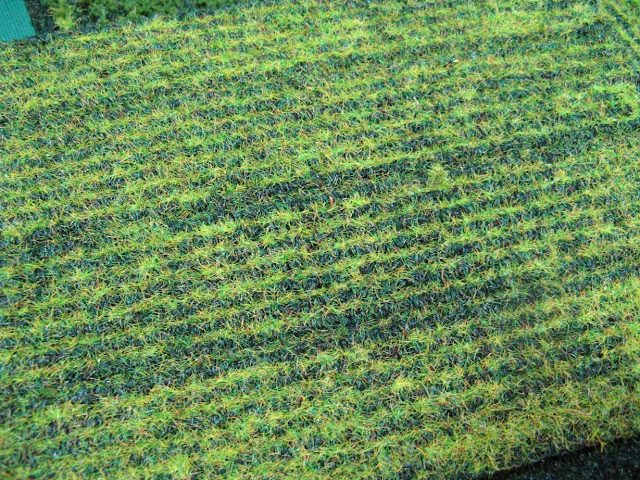
Following on from the Wheat Fields that I made last week I decided to make a few fields of vegetable crops for my wargames terrain collection. Again these are for 15mm wargaming and are a cheap alternative to pre-made scenery. However, I can't take full credit for this particular build project as I took a lot of inspiration from the excellent scenery on The Terrain Guy Blog.
To complete this project I needed a cheap corded doormat, some PVA glue, a pack of Woodland Scenic's clump foliage and a couple of wooden coffee stirrers.
I started by buying a cheap corded doormat for the princely sum of One Pound from a local corner shop. I wanted to get a dark brown mat but they only had dark green in stock but I decided to press ahead with my idea anyway. At worst I would be down £1 and a few hours of labour. As it is I'm pretty happy with the results and think the Dark green works, as well as a brown mat, would have.

I started by making a 'proof of concept' test piece. This was a small off-cut and would otherwise have been thrown away. I tried several ways of applying the clump foliage to the grooves of the mat using the PVA glue and eventually settled on the method illustrated below.
I cut the mat into 8 rectangular fields of various sizes using a sturdy pair of scissors. Then I trimmed the edges to make the fields neat and regular. Again I found it best to use a sharp pair of strong scissors to make light work of the rather tough fibres. The next step was to break down some clump foliage (the type used by model rail enthusiasts and Wargamers alike) into very fine pieces. I tried doing this by hand but realised this would take a long time. So I found an old coffee bean grinding machine (electrical) and used that to reduce my clumps to the consistency needed... don't tell the wife!
Glueing the reduced clump material to the mat required a liberal application of PVA Glue. This was laid down one line at a time and the 'foliage' sprinkled onto the line and pressed into place with wooden sticks. Eventually, I worked out a technique that makes this process much faster. I used one stick 'behind' the row of glue and used a second stick to push the foliage into place. Using the sticks like flat paddles I was able to get rather neat looking lines of 'vegetables' with a visible gap between the rows.
Don't be afraid to use lots of PVA as much of it soaks into the mat and you need plenty to keep the foliage in place. I found it best to complete one field then press the surface with a book (suitably protected of course) then set aside to dry overnight. I think the resulting fields will be fairly durable as well as looking good.

Another version I tried and liked was a field of smaller vegetable or perhaps a young crop. For this, I applied a smaller amount of glue into the grooves of the mat then sprinkled static grass across the surface before tapping off the excess.
I will definitely make some more fields like this although I will try to get some different coloured foliage to use to represent different root crops. Scattered between the Wheat Fields I did last week they should give a nice 'patchwork quilt' effect for my Normandy countryside.
UPDATE: Since writing this article I have undertaken several other 15mm terrain projects that you may find useful or interesting.
UPDATE: Since writing this article I have undertaken several other 15mm terrain projects that you may find useful or interesting.
- Making Normandy Bocage and the follow-up article More Normandy Bocage illustrate my method for making these distinctive French hedgerows.
- I have also made some Farmyard Gates built specifically to fit into the Bocage I now have.
- I also made a load more Farmland & Fields using a different method to that shown in this article.
- This Marshy Stream was made for 6mm wargaming but to be honest, could be used in larger scales.
- On a grimmer note, I also made some Dead Cow terrain for my Normandy games.
- Here are some Boundary Walls for 15mm.
- And lastly, a scratch-built MG Nest


Looks good, thank you for the tip.
ReplyDeleteCheers
Christopher
Those are excellent especially like the first one.
ReplyDeleteThe second version (using static grass) was an experiment. It looks OK but not as good as the clump foliage version. the only thing that stopped me in the end was running out of materials. I'll definately pick up another mat and some more foliage for a second batch of fields.
ReplyDeleteLooks good. Could you try painting a brown emulsion into the recesses?
ReplyDeleteI really like your results. Great looking terrain!
ReplyDeletethe clumps are outstanding mate,some top terrain.
ReplyDeletelee
Some great terrain ideas. However I've only just built myself a field!
ReplyDeleteWhy couldn't you have posted this sooner and saved me some time.
Seriously - very well done.
Tony
http://dampfpanzerwagon.blogspot.com/
I really like the first mat! I need to try this. Busch and Noch make a lot of model crops that might come in handy for such a project.
ReplyDeleteThanks for the guide. I knocked out three of these today!
ReplyDeleteThanks for providing how you did this - I'm going to give it a try!
ReplyDeleteHi,
ReplyDeleteI do the same type of thing but let me pass on a little trick I use. Instead of glue I use caulking. It comes in light and dark brown and it is sticky enough to hold rocks and foliage in place. But the great thing is it is flexible, so doesn't break with use. Don't know if you call it something different in the UK, but here's a link:http://www.lowes.com/pd_219661-68-11509_0__?productId=3025011&Ntt=caulk&pl=1¤tURL=%2Fpl__0__s%3FNtt%3Dcaulk
Give it a try!